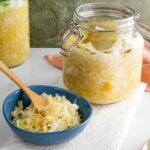
Description
This homemade sauerkraut recipe is so simple & ready to eat in just 5 days. Slice your cabbage, add salt, jar, & before too long... enjoy!
Ingredients
- 1 kg cabbage (taiwanese flat cabbage, green cabbage, or red cabbage)*
- 1 tbsp salt (18 grams, non-iodized sea salt, kosher salt, or himalayan pink salt)
*Fresh ingredients you need that are not part of our pantry and freezer tips.
Instructions
- Prepare your cabbage by removing any wilted outer leaves or those that are discoloured.
- Remove and reserve 1-2 leaves which will not be shredded and will be used later.
- If your cabbage weighs more than 1 kg (or 2.2 pounds) you can reserve the rest of it for another recipe. Alternatively, if you would like to ferment more than 2.2 lbs use a ratio of 1 tsp salt (5-6 g) per extra pound of cabbage.
- Quarter the cabbage, slice around the thick core to remove it (you can chop it small and add it to another recipe if you’d like) and slice the cabbage thinly by hand or by using a mandolin. The slices don’t have to be extremely thin but shouldn’t be too thick either.
- Add the sliced cabbage to a large mixing bowl and sprinkle with the salt. With clean hands, massage the salt into the cabbage until you start feeling it softening and releasing liquid. You can either continue to massage the cabbage for 5 minutes until it is very soft and lots of liquid has been released OR you can cover the bowl with a damp cloth and allow it to sit for up to 2 hours. The salt will work to extract the juices from the cabbage and after sitting for 2 hours it will be easier to massage. When the cabbage has been softened and a good amount of liquid has gathered at the bottom of the bowl you can proceed to jarring the cabbage.
- Using a sterilized 1 quart (32 oz) wide mouth glass jar (and preferably silicone or wooden utensils whenever handling your cabbage), pile the sliced cabbage into the jar. As you fill the jar, use a tamper or something like the handle end of a wooden mixing spoon to press the cabbage down as compact as possible. As you press the cabbage more liquid will be released. You want the cabbage to always be covered by its own liquid so make sure to really press it down. Leave at least two inches of space between the top of the cabbage and the opening of the jar.
- Place the large reserved cabbage leaves on top of the shredded cabbage as a barrier (fold them as needed). Press everything down again to make sure that the liquid rises above these larger leaves.
- Add a weight to keep the cabbage submerged. I use a mason jar weight but if you don’t have one I have seen others place a 4 oz jam jar or small ceramic ramekin on top. Some people go without a weight but you’ll have to be more diligent to make sure the cabbage stays covered in liquid as it ferments and push it down as needed. Make sure that the weight is also covered by liquid and that there is at least 1 inch of space between the top of the liquid and the lid of the jar to prevent overflow during the fermentation. *See notes if your cabbage has not released enough liquid to cover.
- Ideally, secure with an airlock lid or a silicone pickle pipe. If you don’t have either of these fermenting lids you will have to remove the lid of your jar twice a day to release gases from the fermenting cabbage (a jar with a clamp lid makes this even easier). Preferably avoid metal lids during fermentation if you have plastic.
- Place your jar on your countertop away from direct sunlight and ferment for at least 5-6 days. As a precautionary measure you can place the jar in a larger dish to catch any liquid that might overflow. Even with a pickle pipe you may notice some pressure causing the silicone to bloat and you might have to pinch the pickle pipe to release some liquid. Remember to burp your jar by removing the lid twice a day if you are not using a fermentation lid. *Not overfilling your jar will prevent against any overflow.
- After 5 days you might already notice that there are less bubbles in the jar and less gas being released. Once the bubbles and gases have calmed you can taste the cabbage (preferably handling it with silicone or wooden utensils) and see if you want to leave it on the counter longer to develop a stronger taste. I typically don’t leave mine for more than 7 days but I have seen others leave it for up to 20 days or more.
- Once you are happy with the fermentation, remove the fermenting lid and weight if you are using one and secure a tight fitting lid. Refrigerate the sauerkraut. The sauerkraut will continue to ferment in the fridge but at a much slower pace. As you draw sauerkraut from it make sure that the remaining cabbage stays submerged by liquid. Stored well this sauerkraut will last in your fridge for several months. Try it on my delicious vegan reuben sandwich!
Notes
Approximate Cost: $2.66 Canadian for 1 litre of sauerkraut. The lowest price at my local grocery store is $5.79 for 796 ml. Organic sauerkraut from my wholesale store would cost me $12.99 for 1.5 litres. *Keeping an eye on the price of cabbage and buying it on sale will result in the most savings.
If using red cabbage it can release less liquid than green cabbage. If not enough liquid has come out of the cabbage to keep it submerged you can top it off with a 2% brine. Dissolve 5 grams (or 1 tsp non-iodized salt) in 250 ml (1 cup) of filtered water. Add the cooled water to the jar as needed.
It is generally recommended to avoid stainless steel utensils when handling fermented foods. It is thought that the steel can kill the beneficial microbes (I have heard some differing opinions on this but I still avoid steel just in case). Fermentation can eat away at plastic so it is also good practice to not store fermented foods in plastic containers.
I haven’t tried adding additional ingredients to my sauerkraut but I know others add sliced carrots, ginger, or even apple. Sometimes cumin seeds can be added as well. Let me know in the comments if you add additional ingredients!
- Prep Time: 20 minutes
- Category: Thrifty How-Tos
- Method: Fermented
- Cuisine: Central European