
Can you believe you can brew kombucha at home for less than $1! Every time I brew a gallon of kombucha I am saving around $30 compared to store-bought kombucha. Although the process takes a few days, brewing kombucha at home is very simple. Here is everything you need to know for how to brew kombucha on your countertop!
Tangy, fizzy, tasty
Full of potential health benefits
Simple to make
Flavoured however you like best
And so thrifty!
What Is Kombucha
Kombucha is fermented sweet tea. Not only is it a deliciously tangy and slightly fizzy beverage, it is also full of potential health benefits from the probiotics created during fermentation. If you are interested in reading more about the origin of kombucha, You Brew Kombucha is a fantastic online resource for home brewers. For some more reading on the potential health benefits of kombucha you can peruse this healthline article.
Ingredients For Kombucha
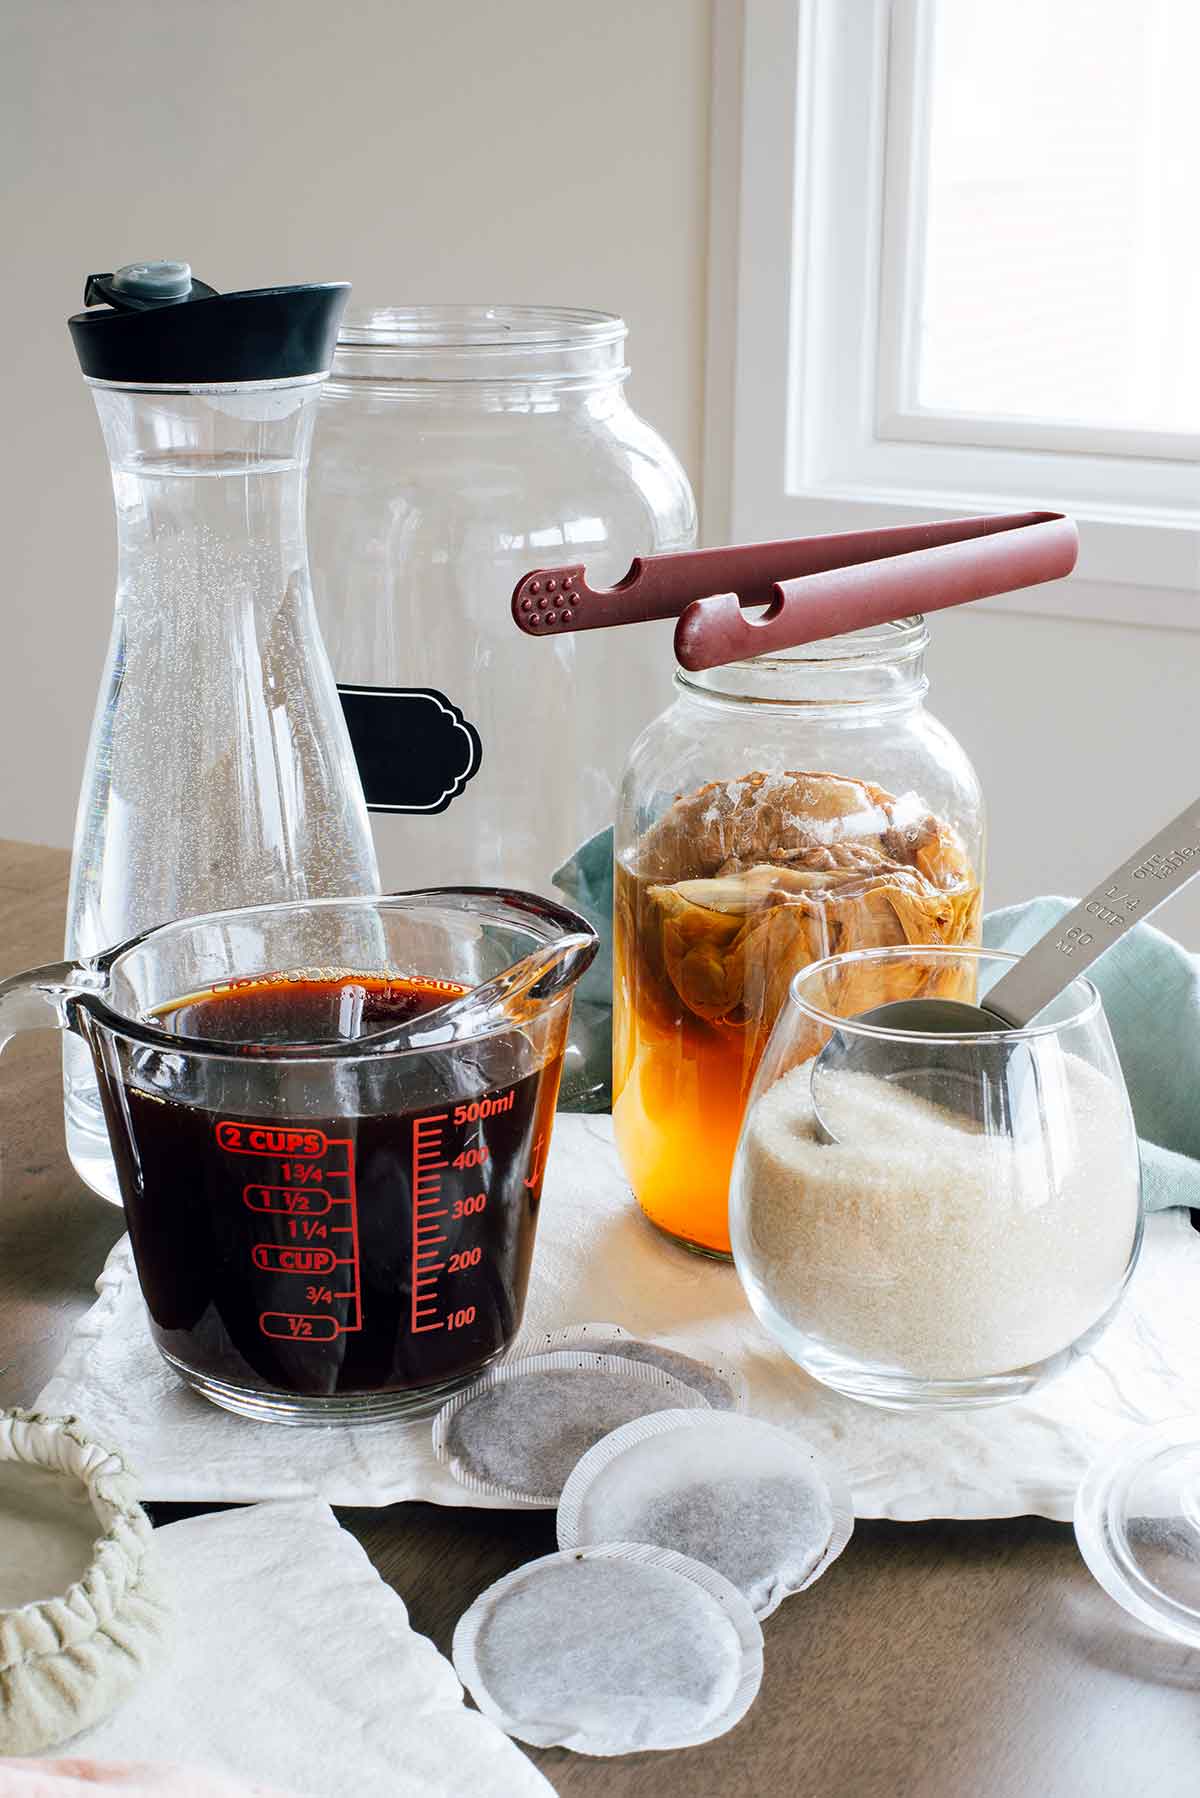
The reason kombucha is so thrifty to brew at home is that the ingredients are few and very simple. You only need 4 ingredients to brew kombucha and 3 are probably already in your kitchen.
- Caffeinated unflavoured black tea
- Organic cane sugar
- Filtered water
- And... a SCOBY
You can use any tea that comes from the camellia sinensis plant for kombucha. Black tea; however, is the most common. I personally, have not yet experimented with any tea other than black tea. It seems that black tea provides the healthiest environment for the SCOBY to thrive in. It's also the easiest for home brewers to maintain.
I use organic cane sugar in all of my baking so that is what I use for my kombucha. You can use plain white table sugar if you'd like. You just want to avoid any alternative sweeteners, brown sugar, coconut sugar, powdered sugar etc.
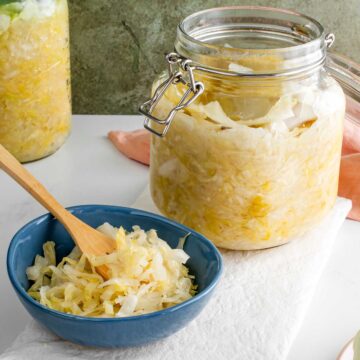
What Is A SCOBY & How To Get One
The SCOBY is the only ingredient needed for kombucha that you will likely need to source. The great thing is that once you have a SCOBY it multiplies with every batch and as long as you keep it healthy you should never need to get another one.
SCOBY is an acronym which stands for, Symbiotic Culture Of Bacteria and Yeast. I think it is most helpful to think of the SCOBY as a two part ingredient. Most people think of the SCOBY as the squishy, icky-looking cellulose mat or pellicle that floats on top of the kombucha as it ferments. However, the starter tea that the SCOBY lives in is what really houses all of that precious good bacteria and yeast and the pellicle acts mostly as a protective barrier during fermentation. So, you need both and they are the mother culture required to ferment your sweet tea!
How do you get a SCOBY?
- A new SCOBY grows on top of the kombucha every time you brew a batch so the best way to acquire one is from someone who already brews kombucha. Most home brewers will keep a few back up SCOBYs in something affectionately called the... SCOBY hotel. This "hotel" is a glass jar that can house a few SCOBYs in starter tea so that they stay healthy. They can be a back up to the brewer in case something goes wrong or a gift to someone starting out with their own batch. (I took a fermentation workshop to learn how to brew kombucha and the instructor gave us all a SCOBY to take home).
- You can purchase a SCOBY in starter tea online. Angelica at You Brew Kombucha has some pointers for finding a reputable seller here. I have added a couple of good options to our Amazon store.
- Growing a SCOBY from scratch is also a possibility. Once again, I will link you to Angelica's blogpost "How To Grow Your Own SCOBY". Essentially, you purchase the most trustworthy unflavoured store-bought kombucha you can find and try to grow a SCOBY on its surface. This option may not produce as healthy of a SCOBY as the previous two options.
Materials For Home Brewing
If you are learning how to brew kombucha at home for the first time you may need to invest in a few simple items. If you are interested in looking at the materials I use, you can find them on our Amazon store.
You will need a 1 gallon wide mouth glass brewing jar. Ensure that your glass is strong enough to handle the pressure that builds up in a fermented beverage. It is best to buy glass that is recommended for brewing kombucha or other fermented beverages.
A breathable cloth cover needs to be placed over the brewing jar while the kombucha ferments. I use a reusable cloth cover with a sewn in elastic but you could use a coffee filter and secure it to the jar with an elastic band.
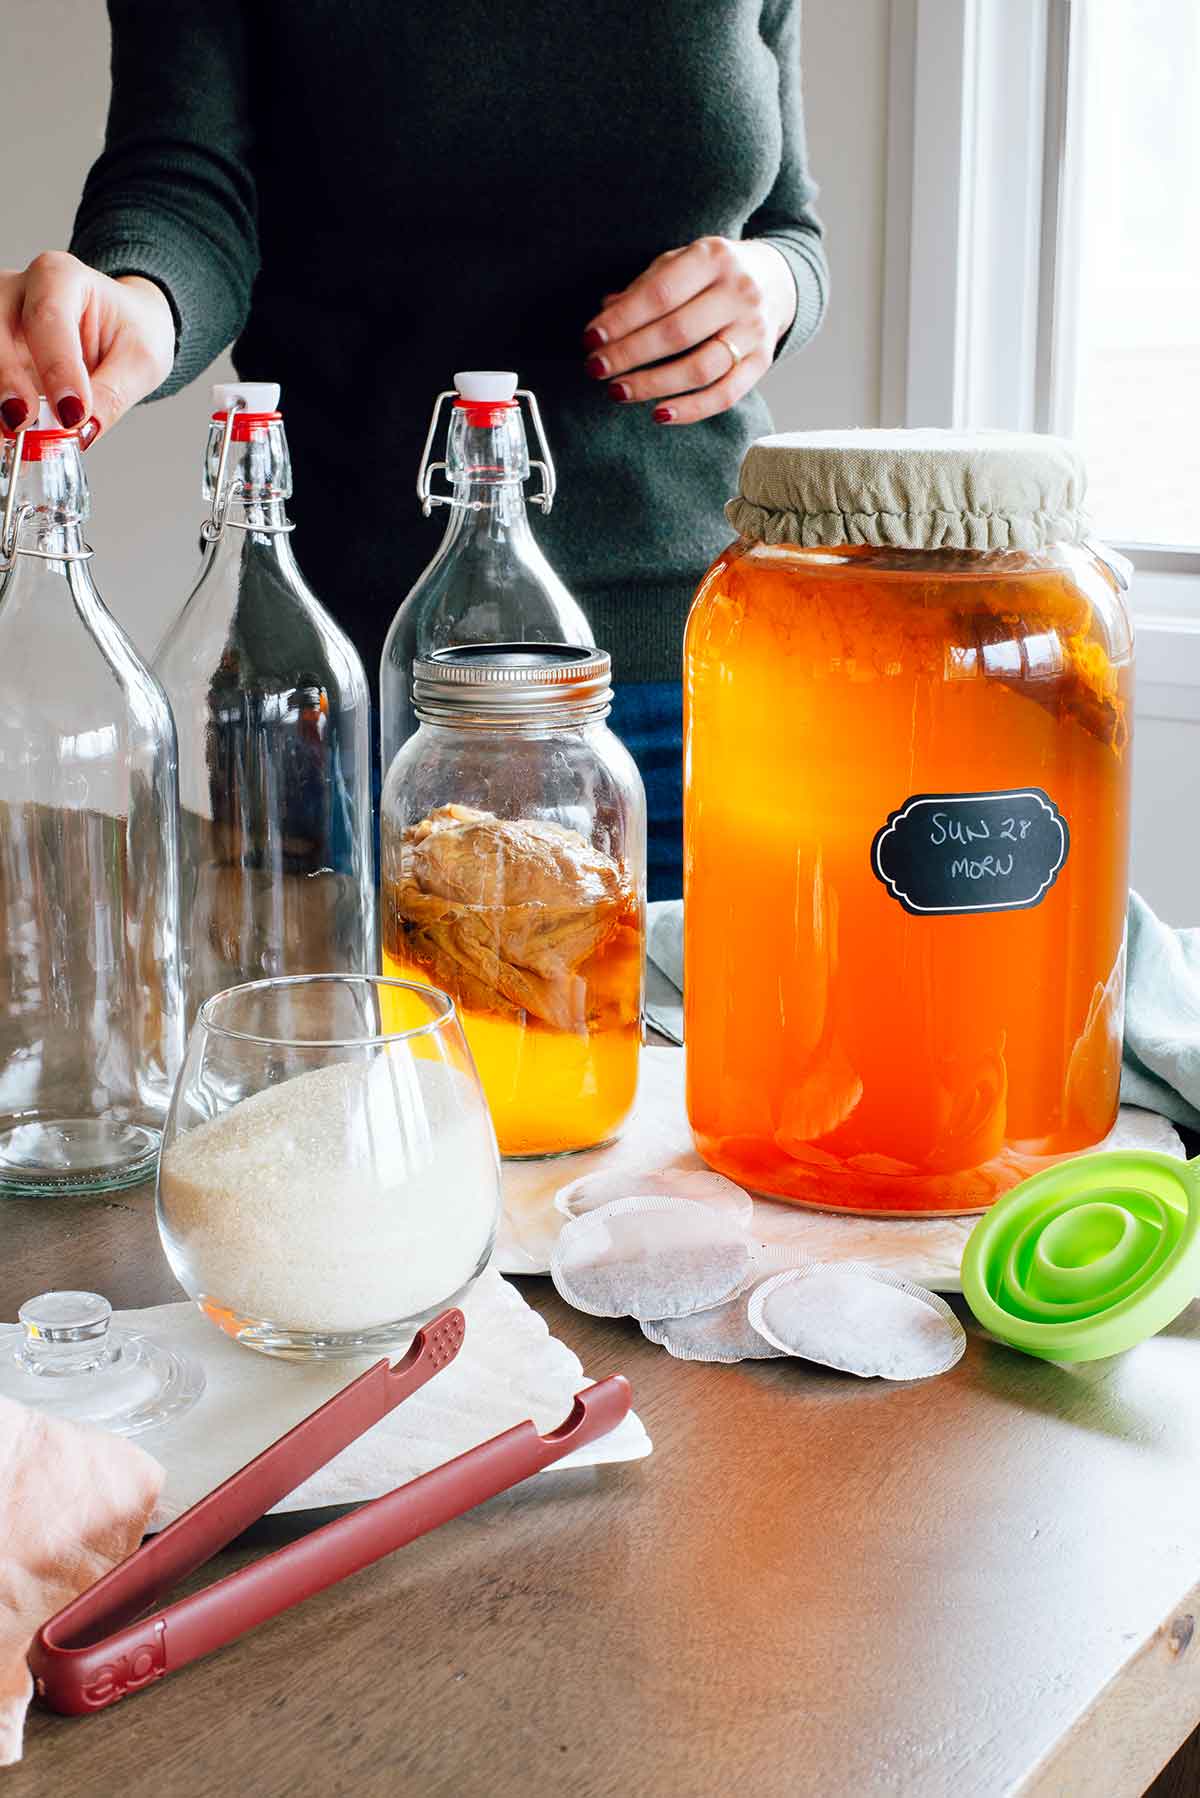
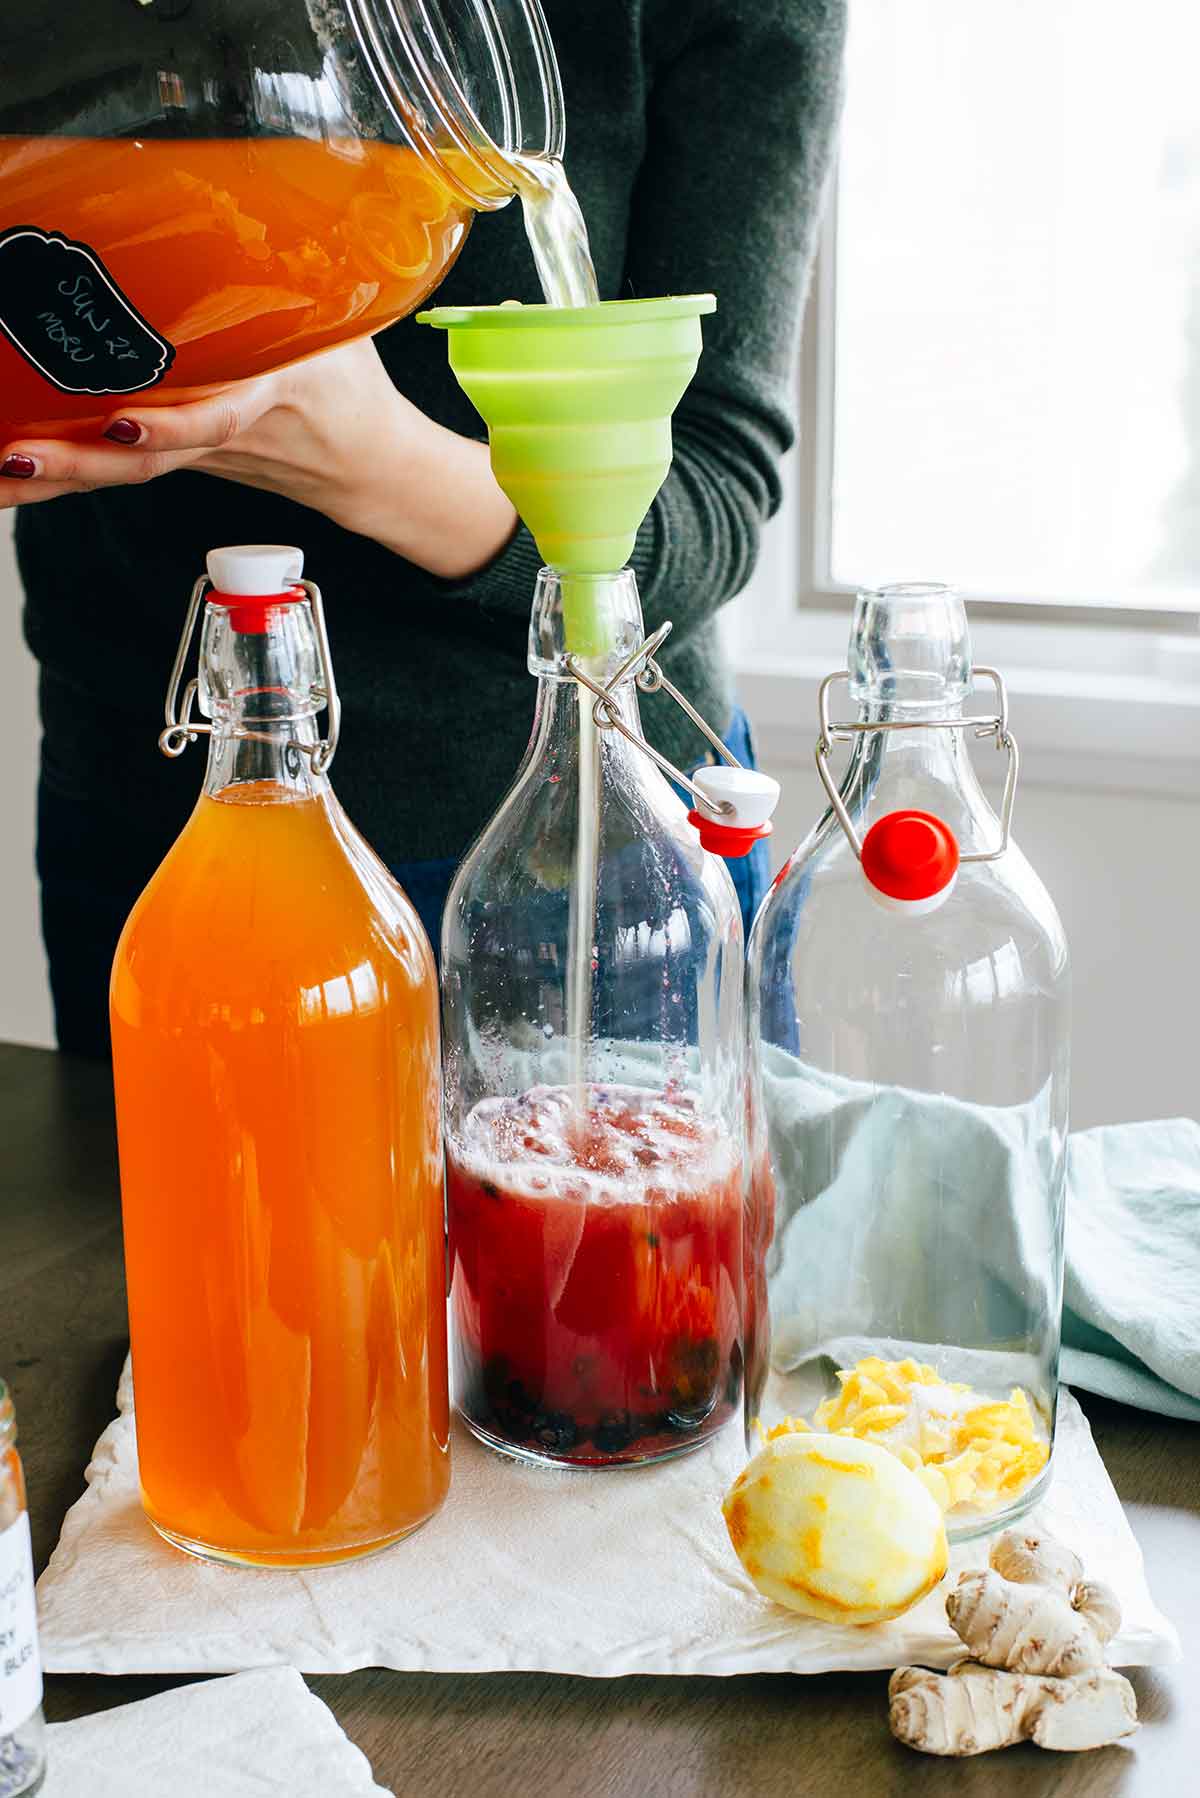
Then you will need to bottle your brewed kombucha. From 1 gallon of kombucha you will fill three 1 litre (32 oz) bottles or six 500 ml (16 oz) bottles. I prefer swing top glass bottles designed for fermented beverages.
Another smaller strong glass jar with a lid is recommended for housing your SCOBY hotel. Many people use a breathable cover for the SCOBY hotel and that works too!
Finally, some things make brewing and bottling easier. A funnel, tongs, a fine sieve, a 2 cup glass measuring cup for brewing your tea, and wooden spoons. Many people suggest avoiding metal utensils because they can potentially harm the good bacteria in the kombucha. You can try and use wooden or silicone utensils where possible.
How To Brew Kombucha
Another wonderful thing is that you can flavour your kombucha however you like BUT raw, unflavoured kombucha is also delicious (and the thriftiest option)!
First (or Primary) Fermentation
This first fermentation process will transform sweet tea into raw unflavoured kombucha. You will:
- Brew caffeinated unflavoured black tea in 2 cups of water.
- Dissolve cane sugar into the hot tea.
- Add the tea concentrate to a 1 gallon glass brewing jar.
- Dilute the sweet tea with cool water, filling the jar nearly to the top.
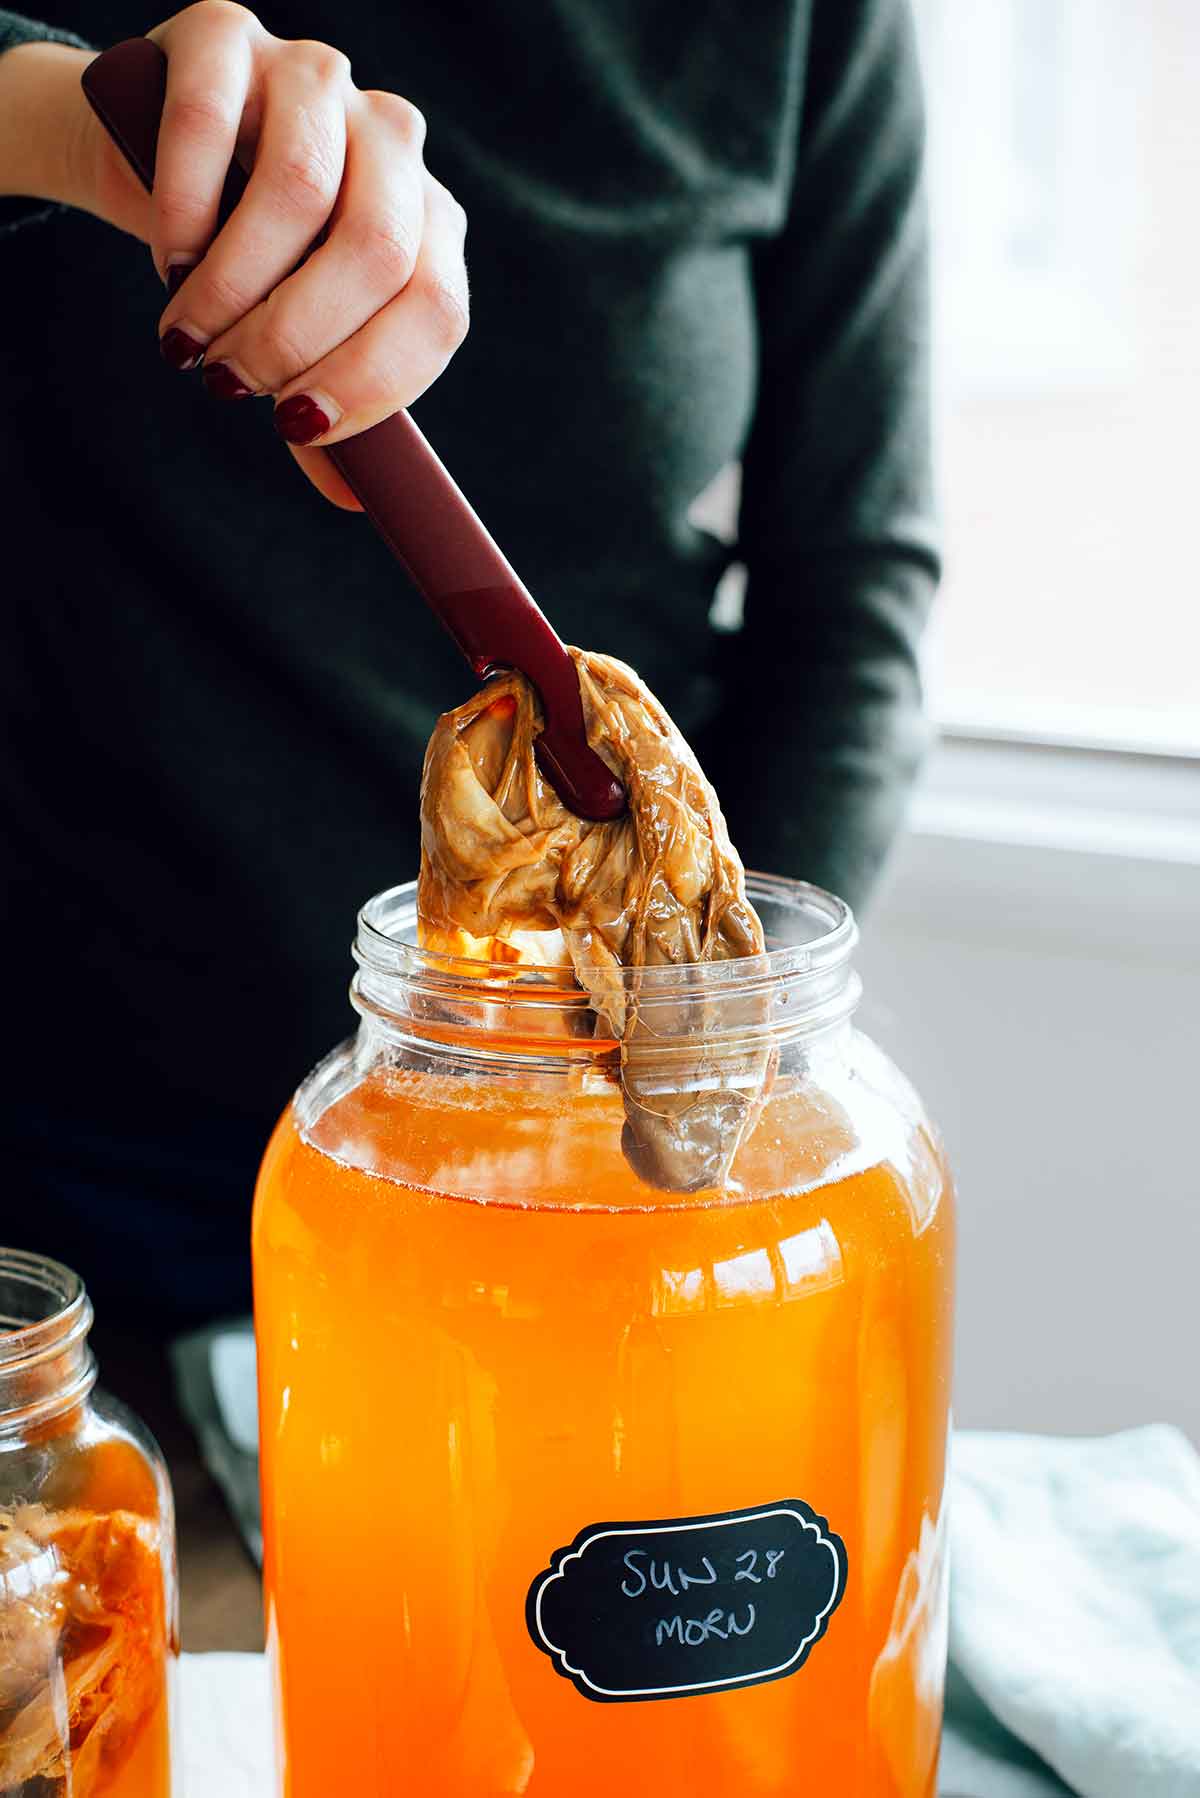
- Once the sweet tea is room temperature, add the SCOBY pellicle and starter tea.
- Place the jar in a shady spot on your counter to ferment for 5-20 days.
How long your kombucha ferments is up to your taste preference. The longer it ferments the less sweet and the more acidic it will become.
After the first fermentation:
- Remove the SCOBY pellicle and reserve at least 2 cups of kombucha to become your starter tea for your next batch and/or fresh tea to feed your SCOBY hotel.
- Fill your bottles with your raw kombucha and refrigerate OR proceed to the second fermentation.
Second Fermentation
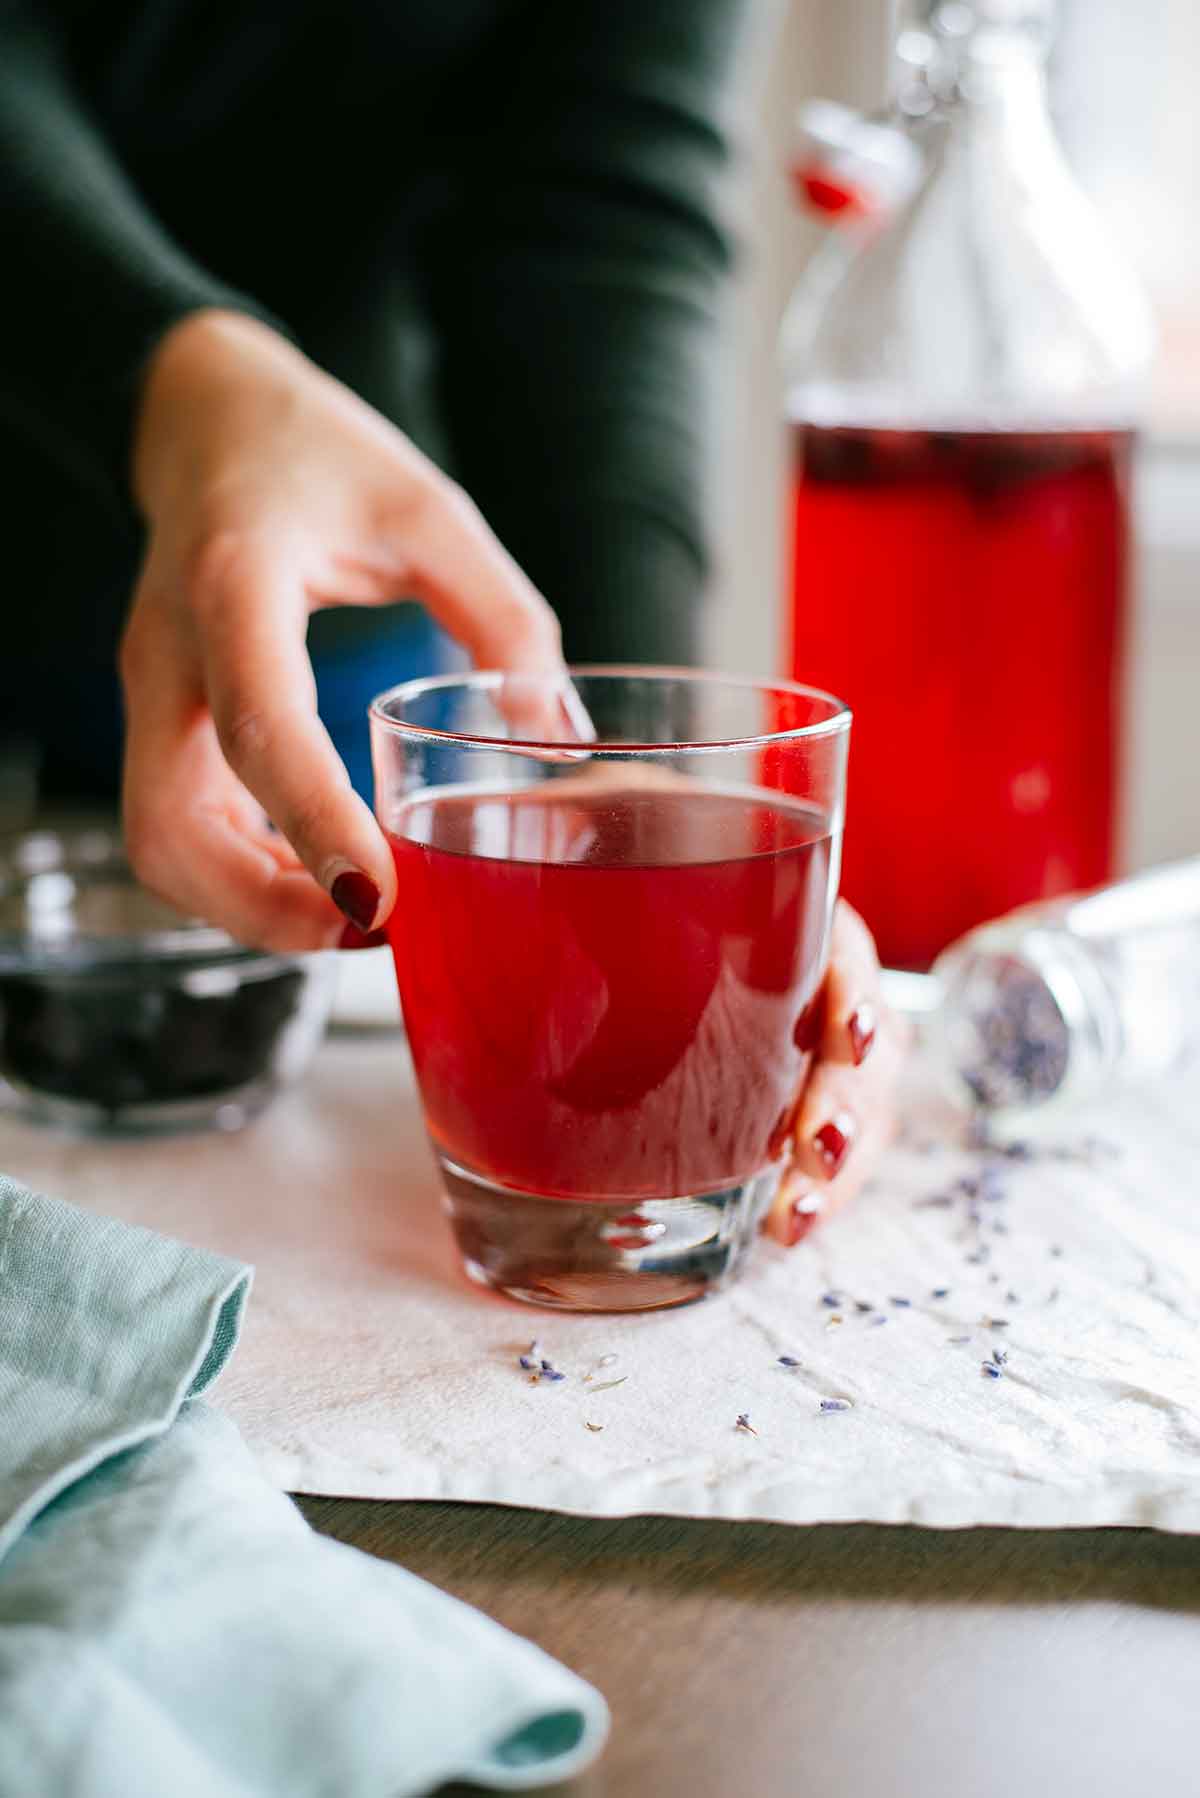
To add flavour to your kombucha you can add fruit, herbs, and spices and allow it to ferment for another 2-4 days. This will also increase the fizziness of the drink.
- To your bottles, add ¼ cup fruit (puréed, mashed, diced, or juiced), 1 teaspoon cane sugar, and any herbs or spices you desire.
- Fill the bottles with raw kombucha.
- Secure the airtight lids.
- Place the bottles in a shady spot on your counter for an additional 2-4 days.
- Before opening any bottles, store them in the fridge for 12-24 hours. This will slow the fermentation and prevent any kombucha explosions!
That last point is key to stabilizing your kombucha and preventing it from all fizzing up and out of the bottles after the second fermentation.
Continuous Brewing / SCOBY Hotel Health
If you always want to have a supply of kombucha in your fridge then you can start another batch after you bottle your current one. This is called continuous brewing. However, if you don't want to brew another batch after you bottle your current one then you can keep your SCOBY healthy in the SCOBY hotel.
The only differences to the process lie in what you do with the 2 cups of starter tea you reserved from your current batch and where you put your pellicle next.
- For continuous brewing: one cup of starter tea will go into your next batch of kombucha and the pellicle will be added to the top of the sweet tea. The remaining one cup of starter tea can be used to replace any old tea in your SCOBY hotel. (If you are just starting out and still only have one SCOBY then you can put both cups of starter tea into your next batch).
- To stop brewing and store your SCOBY for later: use both cups of reserved starter tea to replace any old tea in the SCOBY hotel and place the pellicle into the hotel. Secure a tight-fitting lid and place the SCOBY hotel in a shady cupboard. (Remember: the SCOBY hotel is a strong glass jar that can house your SCOBYs in healthy tea when they are not being used).
Note: I've always used a tight-fitting lid for my SCOBY hotel and my SCOBYs have stayed healthy with regular feedings. The lack of oxygen forces them into a slow fermentation state so I haven't had any issues with the jar breaking. However, many people do suggest using a breathable cloth cover for the SCOBY hotel and that is a very safe option. You may just notice more evaporation of the liquid in your hotel and; potentially, a strong smell.
SCOBY Hotel Feeding
Your SCOBY can survive in the SCOBY hotel for as long as you keep it healthy. Best practice is to feed your SCOBY hotel fresh sweet tea every two weeks. If you are continuously brewing you will be doing this naturally. If you are storing your SCOBY for later use then you have to feed it.
SCOBY hotel feeding:
- Brew 1 caffeinated black tea bag or 1 teaspoon loose leaf black tea in 2 cups water.
- Dissolve 2 tablespoon cane sugar into the hot tea.
- Allow the tea to cool completely.
- Discard most of the old tea in the SCOBY hotel and pour the fresh and cooled sweet tea into the jar.
- Return the jar to its resting place and ensure the lid (or breathable cloth cover) is secured.
Is My SCOBY Healthy?
You will likely have lots of questions about your SCOBY health once you start brewing kombucha. Once again, the You Brew Kombucha blog is the most comprehensive resource I have found that answers all of my brewing questions!
Some things that are normal:
- Your pellicle might sink to the bottom of the brewing vessel. This could be caused by the sweet tea being too hot when you add your pellicle. (Remember the tea must be room temperature before adding the SCOBY otherwise it can be harmed). BUT, if your tea was cool when you added the pellicle then it could just be a sign of a young SCOBY. After 2-3 days you will likely see it float back up to the top of the jar.
- A pellicle floating on its side is normal and not a cause for concern. A new SCOBY should form on the surface as the tea ferments.
- Yeast strands hanging down from the pellicle are also normal and a sign of a healthy brew. Yeast strands may also gather on the bottom of the jar and can be strained out when you bottle your kombucha.
- White bubbles trapped in the pellicle.
Things that are not normal:
- Blue, green or white fuzzy mold.
- Always ensure your jars and utensils coming into contact with the kombucha are clean to prevent any bad bacteria being introduced. Never put your SCOBY in the fridge. Remember, you want to put your finished kombucha in the fridge so that it stabilizes but if you put your SCOBY or first fermentation in the fridge the cold will force the SCOBY into dormancy and that can encourage mold growth.
If I have learned anything over this past year of brewing kombucha at home it is that it's not nearly as scary as I thought it was! I hope you love brewing thrifty and delicious kombucha as well and remember to leave me comments with your favourite flavour combinations below!
Print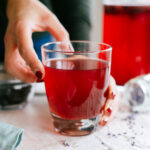
Brew Kombucha At Home - For Less Than $1
- Total Time: 30 minutes (plus 5-24 days fermentation)
- Yield: 3 litres 1x
- Diet: Vegan
Description
Everything you need to know about how to brew kombucha at home. Make this simple and delicious fermented beverage for a fraction of the cost!
Ingredients
First Fermentation
- 4-6 teabags caffeinated black tea (or 2 tbsp loose leaf tea)
- ¾ - 1 cup organic cane sugar
- 1 gallon filtered water
- 1 SCOBY (at least 1 cup starter tea from a previously brewed batch of kombucha + a pellicle)
Second Fermentation
- ¼ cup fruit of choice (puréed, mashed, diced, or juiced)
- 1 tsp organic cane sugar
- Fresh herbs or spices, optional
Our Favourite Flavours
- Blueberry Lavender - ¼ cup mashed frozen blueberries, 1 teaspoon cane sugar, ½ - 1 teaspoon culinary lavender buds
- Apple Cinnamon - ¼ cup applesauce (or apple juice), 1 teaspoon cane sugar, 1 cinnamon stick
- Cherry Vanilla - ¼ cup mashed frozen cherries, 1 teaspoon cane sugar, ½ teaspoon pure vanilla extract
- Lemon Ginger - 2 inches of ginger peeled & sliced, 1 teaspoon cane sugar, zest of one lemon
- Orange Cardamom - ¼ cup orange juice, 1 teaspoon cane sugar, zest of one orange, 1 green cardamom pod (cracked or lightly smashed)
Instructions
First Fermentation
- Brew your preferred unflavoured caffeinated black tea in 2 cups of filtered water.
- Once brewed (usually 3-4 minutes for tea bags) remove the tea and dissolve ¾ cup - 1 cup cane sugar into the tea while it is still hot.
- Add the tea concentrate to a clean 1 gallon glass brewing jar. (Ensure the glass is strong enough for fermented beverages).
- Fill the jar nearly to the top with cool filtered water.
- Once the sweet tea is room temperature (or 70-90 degrees F) add at least 1 cup of starter tea from a previously brewed batch of kombucha and place the SCOBY pellicle into the jar.
- Cover the jar with a breathable cloth cover or coffee filter secured with an elastic band.
- Place in a shady spot on your counter and allow to ferment for 5-20 days.
- You can taste your kombucha after 5 days by dipping a clean straw into the jar. If it is still too sweet you can allow it to ferment longer. Once you are happy with the taste you can proceed to bottling.
Bottling Raw Kombucha
- Remove the SCOBY or pellicle from the brewing vessel.
- Stir the kombucha with a clean wooden or silicone spoon to disperse all the good bacteria.
- Set aside at least 2 cups of the brewed kombucha. This reserved kombucha will become your starter tea for your next batch or it will feed your “SCOBY hotel”.
- If you want to add flavour, proceed to the second fermentation.
- If bottling raw kombucha, simply pour the brewed kombucha through a funnel and into your bottles. I use 1 litre glass swing top bottles that are designed for fermented beverages. Refrigerate your raw kombucha.
Second Fermentation
- To flavour your kombucha add ¼ cup fruit, 1 teaspoon cane sugar, and any additional herbs or spices to your bottles.
- Fill the bottles with raw kombucha leaving at least 1 inch of space at the top of your bottles.
- Secure the lids and place the bottles in a shady spot on your counter to ferment for an additional 2-4 days.
- After fermentation, place the bottles directly in the fridge before opening them. DO NOT open your bottles before refrigerating them. The cold slows down the fermentation and stabilizes the carbonation so that your kombucha doesn’t fizz up and out of the bottles when you open them. Refrigerate for 12-24 hours and then enjoy!
Continuous Brew OR Feed Your SCOBY hotel
- When you are done bottling your kombucha you can start a new batch right away (continuous brewing). Wash your gallon brewing jar and follow the steps above for first fermentation.
- If you do not want to brew another batch of kombucha, place the SCOBY or pellicle in a clean glass jar with the two cups of reserved kombucha you set aside. Secure the jar with a tight fitting lid (or breathable cloth cover) and place in a cool, shaded cupboard. Every two weeks, feed your SCOBY hotel fresh sweet tea. Brew 1 black tea bag or 1 teaspoon loose leaf tea in 2 cups of water. Dissolve 2 tablespoon cane sugar into the hot tea. Allow the tea to cool completely. Discard most of the old tea in the SCOBY hotel and add the fresh cooled sweet tea. Secure the lid or cover and place it back in the cupboard.
Notes
Approximate Cost: 3 litres of raw kombucha costs me $0.70 Canadian! This is an average savings of $30 compared to store-bought kombucha.
Kombucha can be made from teas other than black tea but I have not yet experimented with other tea. As long as the tea is from the "camellia sinensis" plant it can be used for kombucha but black tea provides the most robust environment for fermentation. It is best to stay away from any flavourings because any added oils or perfumes (earl grey tea for instance) can harm the SCOBY.
I've always used a tight-fitting lid for my SCOBY hotel and my SCOBYs have stayed healthy with regular feedings. The lack of oxygen forces them into a slow fermentation state so I haven't had any issues with the jar breaking. However, many people do suggest using a breathable cloth cover for the SCOBY hotel and that is a very safe option. You may just notice more evaporation of the liquid in your hotel and, potentially, a strong smell.
- Prep Time: 30 minutes
- Category: Thrifty How-Tos
- Method: Fermented
- Cuisine: Asian
Melody
You've done a great job with this! I've been making Kombucha for 15 years-ish and my simple, but favorite flavor is a combination of 5 green tea bags (caffeinated, of course) and 3 Tazo Passion tea bags for the first fermentation (per gallon). It's lovely as is, but you could carry it further with a fun addition in a second fermentation. Green or Black Tea must compose more than 50% of the blend.
I'm 67, but truly enjoy watching you and Bryan. You're very fun, yet professional...and the recipes are great, too. Keep up the good work!
Kathryn Alexandre
Oh thank you Melody! We're so glad that you enjoy watching us and trying our recipes too. Thank you so much for the tip about the ratios if we start blending different teas for our first fermentation. Your recipe sounds delicious and must have a really nice and refreshing flavour with the addition of the passion tea (it sounds like that would be be perfect as is). We really appreciate you taking the time to comment here and leave a lovely 5 star review for this beginners tutorial!